Spring Security Authentication
지난 글에서는 Spring Security에 대한 전반적인 내용을 소개했다. 이번 글에서는 Spring Security에서 인증로직에 대해 구체적으로 살펴보도록 하자.
Architecture
Spring Security에서 Authentication에 대한 아키텍처는 다음과 같다. 내용은 참조 문서를 보고 정리하였다.
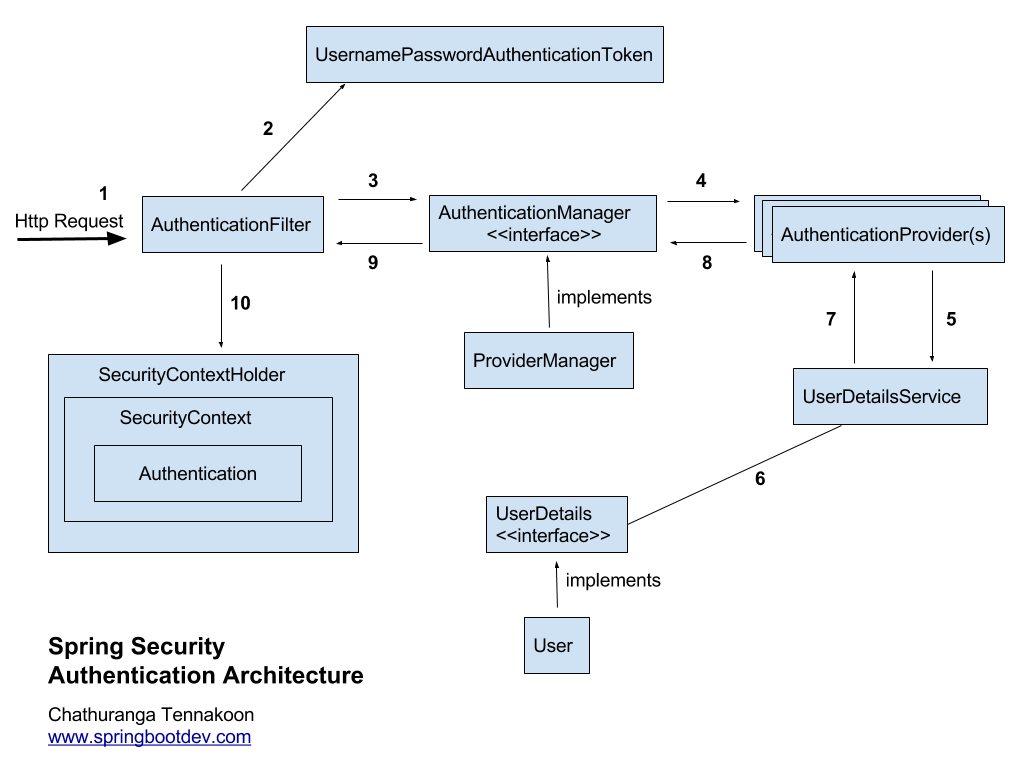
Spring Security에서 인증 절차는 다음 10가지 단계로 진행된다.
1. Http Request
스프링 시큐리티는 필터체인을 거쳐 인증 절차를 확인한다. 그래서 요청이 들어오면 로직이 들어있는 필터체인으로 가서 요청에 대한 인증 절차를 밟는다. 그러기 위해 적절한 AuthenticationFilter 를 찾아 인증 절차를 진행한다.
2. 사용자를 증명하기 위한 AuthenticationToken 생성
인증 요청이 AuthenticationFilter에 도달하게 되면 AuthenticationFilter는 요청으로부터 username 과 password 를 추출한다. 그리고 추출된 데이터를 바탕으로 Authentication 객체를 생성한다.
예를 들어, 추출된 데이터가 username과 password라면, 이걸 바탕으로 UsernamePasswordAuthenticationToken 을 생성한다. (UsernamePasswordAuthenticationToken 는 Authentication의 구현체이다.)
3. 생성된 토큰을 AuthenticationManager에 위임
Token 객체를 생성한 후 token을 AuthenticationManager의 authenticate() 메서드를 호출하는데 사용한다.
public interface AuthenticationManager {
    Authentication authenticate(Authentication authentication)
      throws AuthenticationException;
}
AuthenticationManager의 구현체는 ProviderManager이며, 이는 AutenticationProvider 를 여러 개 가질 수 있다. 이 AuthenticationProvider에 authenticate() 메서드가 있는데, AuthenticationManager.authenticate() 는 AuthenticationManager에 속해있는 AuthenticationProvider.authenticate()를 차례대로 호출시키면서 인증 절차를 진행한다.
4. AuthenticationProvider의 authenticate() 호출하기
여기서는 SpringFramework에서 제공하는 AuthenticationProvider의 여러 구현체가 있다.
- CasAuthenticationProvider: Central Authentication Service (CAS)인증을 담당
- JaasAuthenticationProvider: Java Authentication and Authorization Service (JAAS) 인증을 담당
- DaoAuthenticationProvider: Database를 이용한 인증을 담당
- OpenIDAuthenticationProvider:
- RememberMeAuthenticationProvider
- LdapAuthenticationProvider
Spring에서 제공하는 구현체를 사용하거나, interface를 구현하는 구현체를 직접 정의해서 사용할 수도 있다.
5. UserDetailsService (Optional)
Spring에서 제공하는 AuthenticationProvider 구현체 중 어떤 것은 사용자 정보를 찾기 위해 UserDetailService가 사용된다. (DaoAuthenticationProvider 가 대표적으로 UserDetailService를 사용한다.)
public interface UserDetailsService {
    UserDetails loadUserByUsername(String username) throws UsernameNotFoundException;
}
UserDetailsService를 사용하는 AuthenticaitionProvider를 사용하려면 UserDetailsService를 Bean으로 등록해야 한다.
AuthenticationProvider를 커스터마이징 한다면 굳이 사용하지 않아도 된다.
6, 7. UserDetails (Optional)
UserDetailsService는 username을 이용하여 UserDetails을 찾는다. 그렇게 해서 AuthenticationProvider에게 UserDetails을 넘겨준다.
마찬가지로 AuthenticationProvider를 커스터마이징 한다면 굳이 사용하지 않아도 된다.
8. Authentication (AuthenticationException)
성공적으로 인증이 되었다면 인증이 완료된 Authentication 객체를 리턴한다. 그렇지 않다면 AuthenticationException을 일으킨다.
9. 인증 완료
AuthenticationManager는 인증이 완료된 Authentication 객체를 AuthenticationFilter에게 넘겨준다.
10. Authentication 객체를 SecurityContext에 설정
인증 완료된 Authentication 객체를 받은 AuthenticationFilter는 그 객체를 SecurityContext에 저장한다. 이 저장된 객체는 후에 권한 인가에서 사용된다.
구현 (커스터마이징)
위에서는 인증 로직에 대한 아키텍처에 대해 알아보았다. 이번에는 실제로 코드로 어떻게 구현하면 되는지 알아보자. 내용은 참조 문서 를 보고 정리하였다.
이전 글에서는 InMemory를 이용한 인증을 구현하였지만 이번 글에서는 DB를 이용한 인증을 구현하는 것으로 커스터마이징 해보자. (실제로는 InMemory만 사용하면 안된다. 프로세스가 죽으면 날아가기 때문..)
여기서 사용될 기술 스택은 다음과 같다. (check는 이미 안다고 가정하고 설명은 따로 하지 않았습니다.)
- Kotlin
- Spring Boot 2
- gradle
- Spring JPA
- Spring Security
설정
의존성 설정은 gradle을 이용할 것이다.
build.gradle.kts
import org.jetbrains.kotlin.gradle.tasks.KotlinCompile

plugins {
    id("org.springframework.boot") version "2.3.0.RELEASE"
    id("io.spring.dependency-management") version "1.0.9.RELEASE"
    war
    kotlin("jvm") version "1.3.72"
    kotlin("plugin.spring") version "1.3.72"
}

group = "com.example"
version = "0.0.1-SNAPSHOT"
java.sourceCompatibility = JavaVersion.VERSION_11

repositories {
    mavenCentral()
}

dependencies {
    implementation("org.springframework.boot:spring-boot-starter-thymeleaf")
    implementation("org.springframework.boot:spring-boot-starter-security")
    implementation("org.springframework.boot:spring-boot-starter-web")
    implementation("org.springframework.boot:spring-boot-starter-data-jpa")
    implementation("org.springframework.data:spring-data-jpa")
    implementation("mysql:mysql-connector-java")
    implementation("com.fasterxml.jackson.module:jackson-module-kotlin")
    implementation("org.jetbrains.kotlin:kotlin-reflect")
    implementation("org.jetbrains.kotlin:kotlin-stdlib-jdk8")
    developmentOnly("org.springframework.boot:spring-boot-devtools")
    providedRuntime("org.springframework.boot:spring-boot-starter-tomcat")
    testImplementation("org.springframework.boot:spring-boot-starter-test") {
        exclude(group = "org.junit.vintage", module = "junit-vintage-engine")
    }
    testImplementation("org.springframework.security:spring-security-test")
}

tasks.withType<Test> {
    useJUnitPlatform()
}

tasks.withType<KotlinCompile> {
    kotlinOptions {
        freeCompilerArgs = listOf("-Xjsr305=strict")
        jvmTarget = "1.8"
    }
}
일단, DB는 MySQL을 사용하기로 하고, 로깅 설정을 하면 공부하기에 좋으니까 로깅 설정을 하자.
application.yml
spring:
  datasource:
    driver-class-name: com.mysql.cj.jdbc.Driver
    url: jdbc:mysql://localhost:3306/{database이름}?serverTimezone=UTC&characterEncoding=UTF-8
    username: {username}
    password: {password}

  jpa:
    database-platform: org.hibernate.dialect.MySQL5InnoDBDialect
    show-sql: true
    hibernate:
      ddl-auto: none
      format_sql: true

logging:
  level:
    org:
      springframework:
        security: TRACE
**{database이름}, {username}, {password}는 사용자마다 다르므로 눈치껏 자신의 환경과 일치하도록 넣어주세요.**
그리고 사용할 테이블을 mysql에서 생성하자. 회원가입 하는 로직은 일단 만들지 않아서 테스트 데이터를 하나 만들어 놓자.(이걸로 로그인을 할 예정이다.)
CREATE TABLE `test_user` (
  `id` int(11) NOT NULL,
  `account` varchar(20) DEFAULT NULL,
  `enabled` tinyint(1) DEFAULT NULL,
  `password` varchar(64) DEFAULT NULL,
  `expired` tinyint(1) DEFAULT NULL,
  `locked` tinyint(1) DEFAULT NULL,
  `credential_expired` tinyint(1) DEFAULT NULL,
  `authority` varchar(10) DEFAULT NULL,
  PRIMARY KEY (`id`)
);

INSERT INTO `test_user` values(1, 'testUser', 1, 'password', 0, 0, 0, 'USER');
AuthenticationFilter
그림을 보면 먼저 인증을 받아야 할 요청이 AuthenticationFilter를 통해 AuthenticationManager를 거치게 된다. AuthenticationFilter는 이전에 작성한 WebSecurityConfig의 configure()에서 정의가 된다.
WebSecurityConfig.kt
@Configuration
class WebSecurityConfig: WebSecurityConfigurerAdapter() {
    override fun configure(http: HttpSecurity) {
        http.authorizeRequests()
            .antMatchers("/", "/home").permitAll()
            .anyRequest().authenticated()
            .and()
            .formLogin()
            .loginPage("/login")
            .permitAll()
            .and()
            .logout()
            .permitAll()
    }
}
여기서 permitAll()(인증 필터를 거치지 않음) 이나 authenticated()(인증 필터를 거침)을 URL별로 설정할 수 있다. 이 코드에서는 "/", "/home", "/login"을 제외한 나머지 URL에 대해서 AuthenticationFilter를 거치게 된다.
AuthenticationManager
AuthenticationFilter 를 거치는 요청 데이터는 AuthenticationManager 인터페이스에서 인증 절차를 밟는다. 스프링에서 제공하는 AuthenticationManager를 사용하지 않고 직접 인증 절차를 구현하고 싶으면 WebSecurityConfig 에 configure 메서드를 오버라이딩 해야 한다.
override fun configure(auth: AuthenticationManagerBuilder?) {
    auth?.authenticationProvider(customAuthenticationProvider)
}AuthenticationManager는 하나 이상의 AuthenticationProvider 를 가지며, 한 요청에 대해 모든 AuthenticationProvider를 돌린다. AuthenticationProvider 는 실제로 인증 로직을 담당하는 클래스이다. 그래서 인증 로직을 구현하고 싶으면 AuthenticationProvider 의 구현체를 직접 만들어서 넣어주면 된다. (커스텀한 클래스를 자바 빈으로 등록한 다음 사용하면 된다.)
AuthenticationProvider를 구현했다고 가정한다면, 코드는 다음과 같을 것이다.
WebSecurityConfig.kt
@Configuration
class WebSecurityConfig (
    private val customAuthenticationProvider: AuthenticationProvider
): WebSecurityConfigurerAdapter() {

    /**
     *  URL마다 보안 설정을 할 것인지 말 것인지 정의한다.
     */
    override fun configure(http: HttpSecurity) {
        http.authorizeRequests()
            .antMatchers("/", "/home").permitAll()   // {/, /home} URL은 인증 과정을 거치지 않는다.
            .anyRequest().authenticated()   // 그 외 나머지 요청에 대해서는 인증 과정을 거친다.
            .and()
            .formLogin()
            .loginPage("/login") // 인증에 실패하면 이 페이지로 redirect 된다. (이 페이지도 인증 과정을 거치지 않는다.)
            .permitAll()
            .and()
            .logout()
            .permitAll()
    }

    override fun configure(auth: AuthenticationManagerBuilder?) {
        auth?.authenticationProvider(customAuthenticationProvider)
    }
}
AuthenticationProvider
그럼 일단 AuthenticationProvider의 구현체를 직접 만들어 보자.
CustomAuthenticationProvider.kt
@Component // 자바 Bean으로 등록!
class CustomAuthenticationProvider (
    private val customUserDetailsService: UserDetailsService
) : AuthenticationProvider {
    override fun authenticate(authentication: Authentication?): Authentication {
        return authentication?.let {
            val username = it.name as String
            val password = it.credentials as String

            val user = customUserDetailsService.loadUserByUsername(username)

            if(password != user.password) {
                throw Exception()
            }

            if(!user.isEnabled) {
                throw Exception()
            }

            UsernamePasswordAuthenticationToken(username, password, user.authorities)
        }?: throw Exception()
    }

    override fun supports(authentication: Class<*>?): Boolean {
        return UsernamePasswordAuthenticationToken::class.java
                .isAssignableFrom(authentication)
    }
}
customUserDetailsService는 추후에 우리가 직접 구현할 UserDetailsService이다. 이 서비스 객체는 Database를 통해 사용자 정보를 가져오는 책임을 가진다. 먼저 인증 절차는 authenticate()를 구현하면 된다.
구현한 인증 절차에 대해 간단히 설명하자면, 요청에 대한 Authentication 객체를 받아와 그 속에 있는 username과 password를 꺼낸다. (username이 name, password가 credential에서 얻어낼 수 있다.) 그 다음 Database를 통해 해당 username을 가진 UserDetails 엔티티를 가져와서 password가 일치하는지 등 값 검사를 한다.
값 검사를 통과하면 UsernamePasswordAuthenticationToken을 만들어 다음 AuthenticationProvider에게 넘긴다. (AuthenticationManager 는 하나 이상의 AuthenticationProvider 를 가진다..)
그리고 supports 메소드는 '이 AuthenticationProvider는 이러이러한 AuthenticationToken만 취급한다!' 라는 것을 설정하는 메서드이다. 즉, 위의 AuthenticationProvider 는 UsernamePasswordAuthenticationToken 만을 취급한다. (저 supports를 false로 두고 실행을 해보자. 그럼 다음과 같은 에러가 뜰 것이다.)
No AuthenticationProvider found for org.springframework.security.authentication.UsernamePasswordAuthenticationToken
UserDetailsService, UserDetails
스프링 공식 문서를 보면 UserDetailsService는 AuthenticationManager 중 Spring에서 제공하고 있는 구현체인 DaoAuthenticationProvider 에서 인증 로직을 구현하기 위해 사용하는 서비스라고 설명되어있다. 사실 커스터마이징을 한다면 내 생각엔 굳이 UserDetailsService를 사용할 필요는 없을 것 같다.
하지만, 공부를 처음 해보는 입장에서 스프링에서 제공하는 인터페이스인 UserDetailsService, UserDetails를 구현한 클래스를 만들어서 사용해보았다.
CustomUserDetailsService.kt
@Service
class CustomUserDetailsService (
    private val testUserRepository: TestUserRepository
) : UserDetailsService {
    private val logger = LoggerFactory.getLogger(javaClass.name)
    override fun loadUserByUsername(username: String?): UserDetails {
        logger.info("DATABASE")
        return username?.let { testUserRepository.findByAccount(it) }
            ?: throw Exception()
    }
}
로직이 복잡하지 않아서 따로 설명할 만한 것이 없지만 여기서 특징이라는게 있다면 문서에 UserDetailsService의 컨셉이 Read-only 메서드만 구현하면 된다는 것이다. 문서에는 다음 문구가 적혀저 있다.
The interface requires only one read-only method, which simplifies support for new data-access strategies.
여기서 든 생각은 UserDetailsService는 인증 로직에서만 사용되는 서비스 객체기 때문에 조회만 하면 된다는 것이다. (굳이 다른 기능까지 추가할 필요는 없다는 뜻.) 이 서비스와 실제로 User 엔티티에 대한 CRUD를 담당하는 서비스를 분리시는 것이 좋을 것 같다는 생각을 했다.
TestUser.kt
@Table
@Entity(name = "test_user")
data class TestUser (

    @Id
    @GeneratedValue(strategy = GenerationType.IDENTITY)
    val id: Int = 0,

    @Column
    val account: String = "",

    @Column
    val enabled: Boolean = false,

    @Column
    private val password: String = "",

    @Column
    private val expired: Boolean = false,

    @Column
    private val locked: Boolean = false,

    @Column
    private val credentialExpired: Boolean = false,

    @Column
    private val authority: String = ""

): UserDetails {
    override fun getAuthorities(): Collection<out GrantedAuthority> {
        return listOf(SimpleGrantedAuthority(authority))
    }

    override fun isEnabled(): Boolean = enabled

     /** username이 계정이라고 생각하면 되는데 이름이 어색해서 account로 했다. */
    override fun getUsername(): String = account

    override fun isCredentialsNonExpired(): Boolean = credentialExpired

    override fun getPassword(): String = password

    override fun isAccountNonExpired(): Boolean = !expired

    override fun isAccountNonLocked(): Boolean = !locked
}
UserDetailsService는 UserDetails 엔티티를 가져오는데 (UserDetailsService에 override 메서드인 loadUserByName()의 리턴타입이 UserDetails라서 어쩔 수 없는 제약조건) UserDetails에서 구현해야 할 메서드가 굉장히 많다. 구현해야 할 getter 메서드들이 많은데 이게 코틀린이랑 호환이 안된다는 단점이 있다.. (코틀린은 프로퍼티를 정의하면 val이든 var든 getter가 만들어지기 때문..)
그래서 코드 길이가 길어지는데 초보 입장에서 '왜 이렇게 프로퍼티가 많아!'라고 생각할 수는 있는데 생각해보면 실제 서비스에서 회원 인증 절차에서 다 필요한 것들이라고 생각이 든다. 그래서 이쪽 도메인을 모른다면 UserDetails를 구현하는 엔티티를 사용하는 것도 나쁘지 않을 것 같다.
이런 제약 조건이 싫고 귀찮으면 UserDetailsService, UserDetails를 사용하지 않고 입맛대로 구현해도 되긴 할 것이다.
TestUserRepository.kt
@Repository
interface TestUserRepository : JpaRepository<TestUser, Int> {
    fun findByAccount(account: String): TestUser?
}
구동
이제 대충 인증로직은 다 짰다. 이제 실제로 어떤식으로 구동되는지 살펴보자. 먼저 프로그램을 띄운 후 http://localhost:8080에 접속하면 다음과 같은 화면이 나올 것이다.
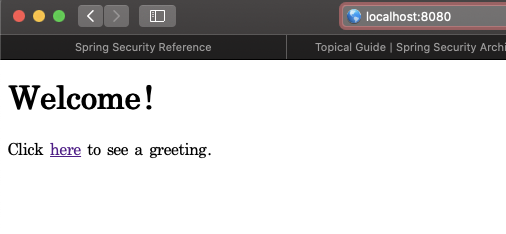
여기서 here을 클릭하면 로그인 화면이 나올 것이다.

데이터베이스에 있는 회원정보와 같은 걸로 usernamer과 password를 입력한 후 Sign In을 하면 로그인 성공을 할 것이다.
여기서, 로그인에 성공한 것 보단 로그에 초첨을 맞춰보자. 로그는 총 두 덩어리로 나뉠 수 있는데 로그인을 시도했을 때 생기는 로그와 /hello로 리다이렉팅 되었을 때 생기는 로그로 나뉜다.
로그인 시도했을 때 생기는 로그

/hello 로 리다이렉팅 되었을 때 생기는 로그
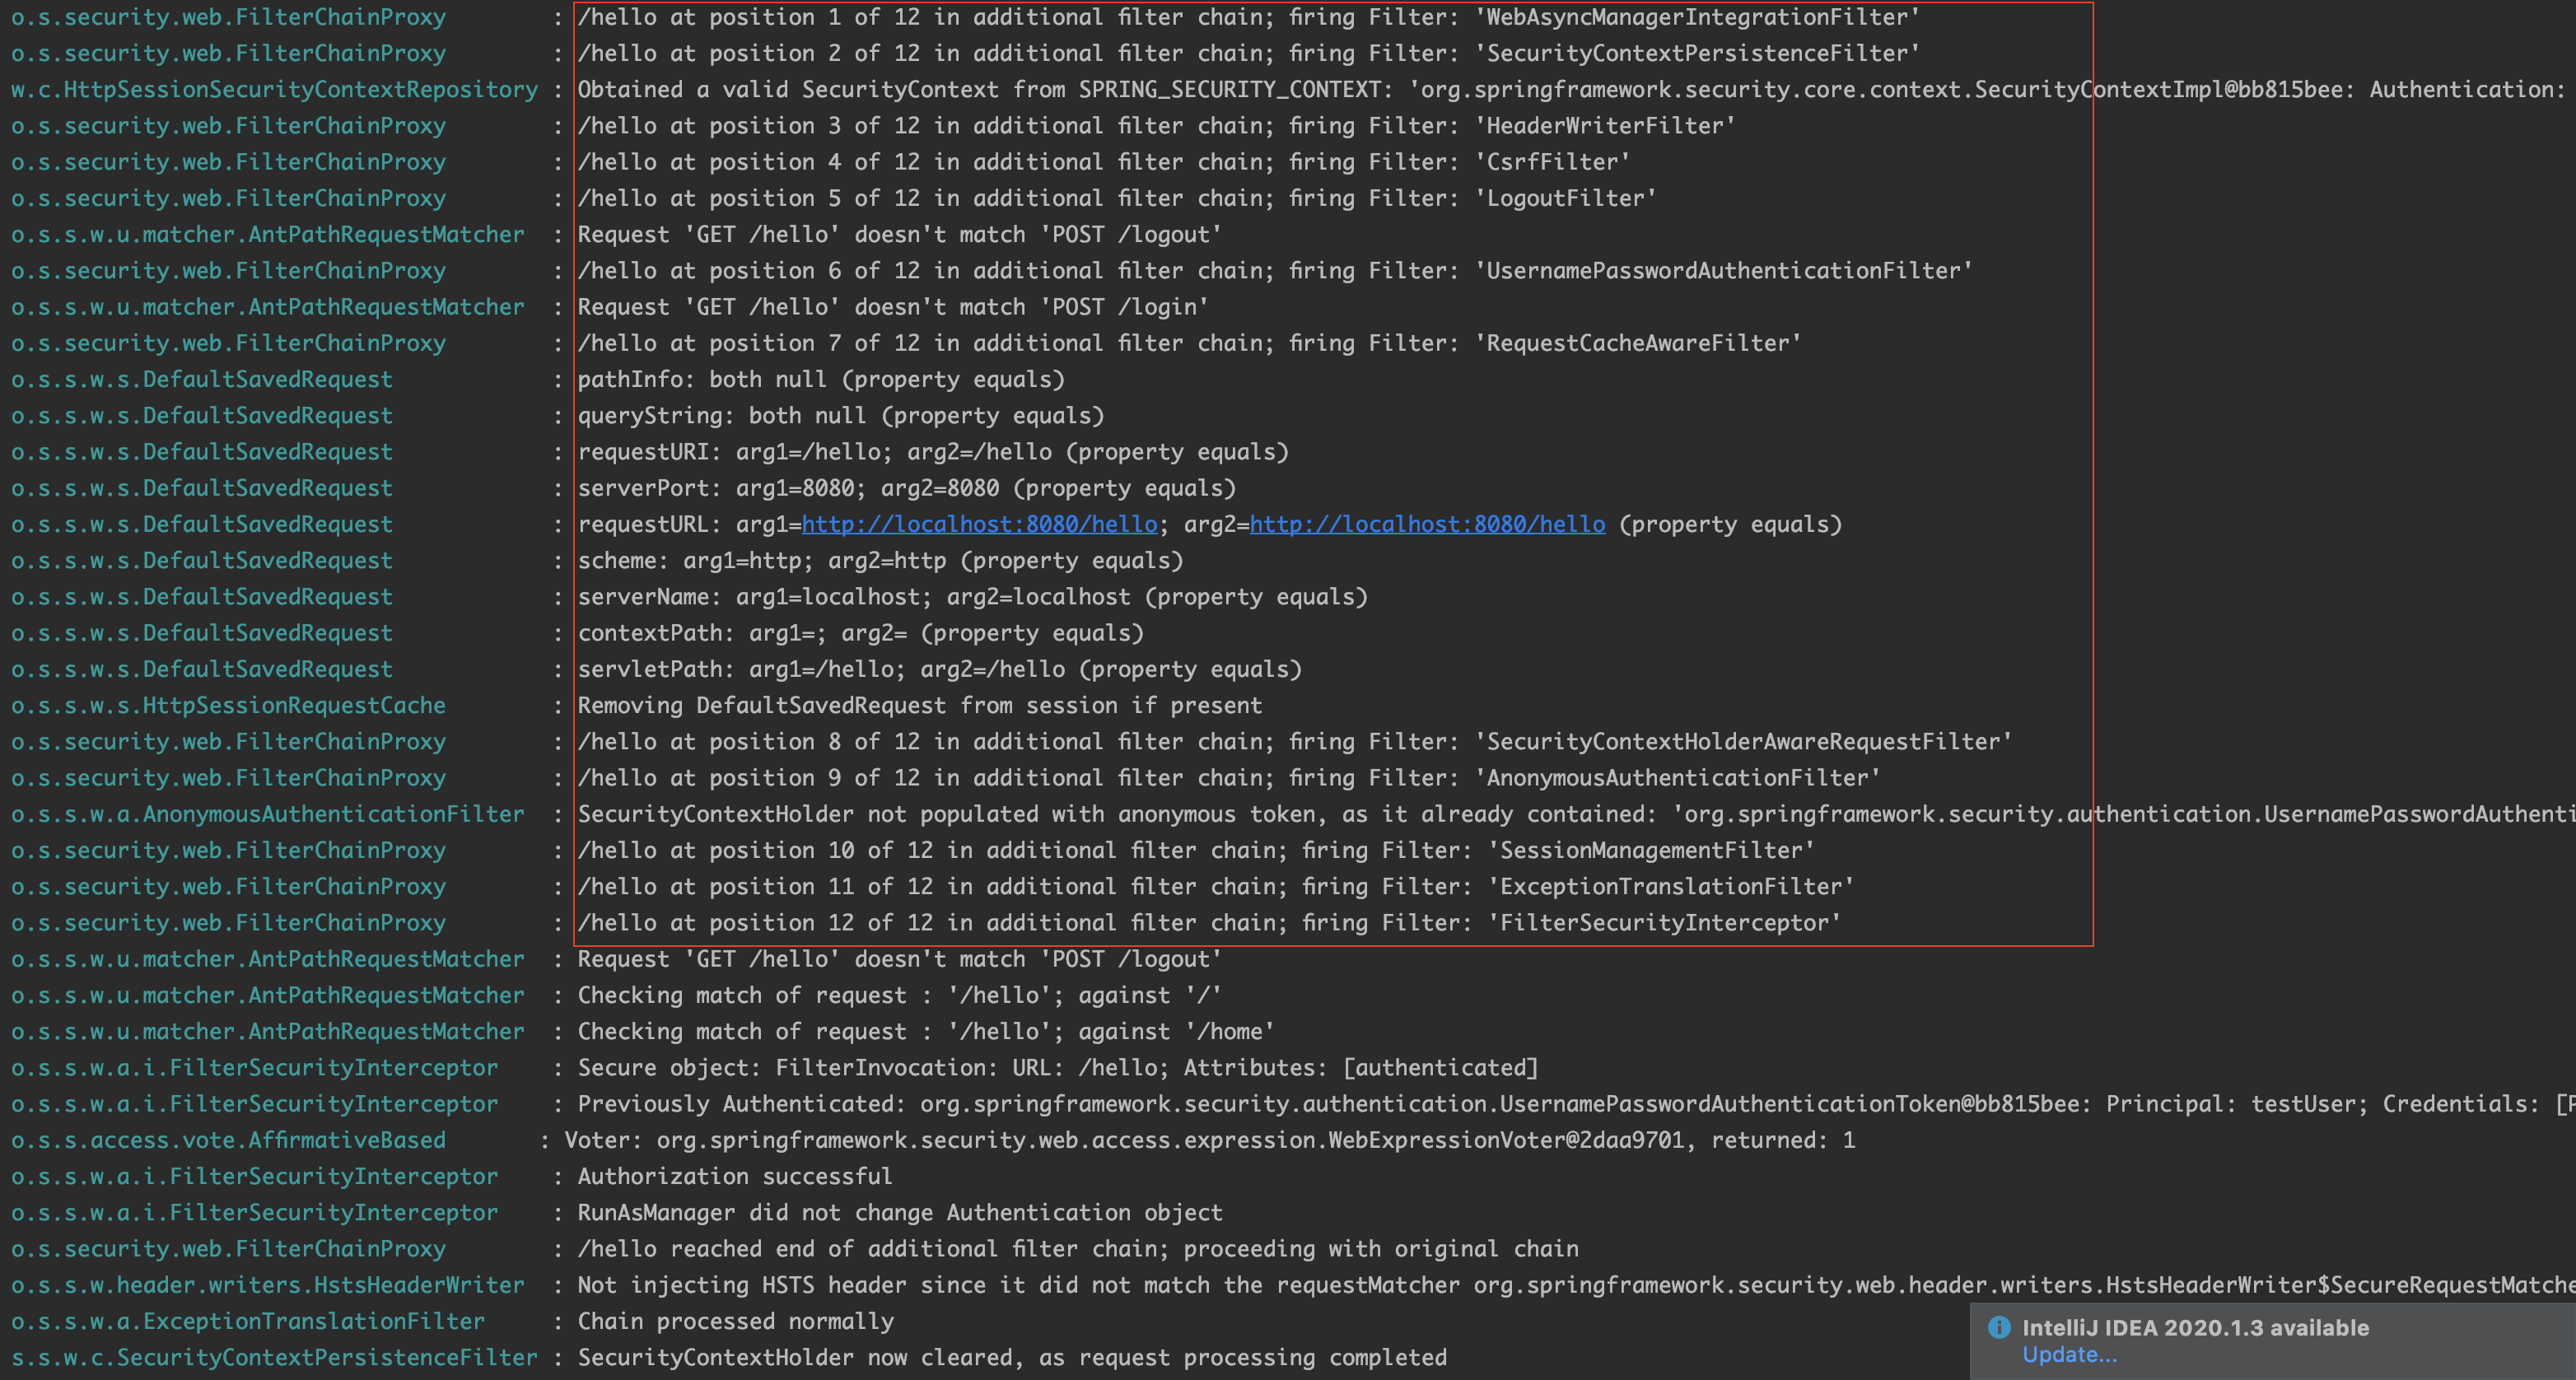
두 로그들을 보면 각각 여러개의 필터체인을 거치면서 인증 절차를 밟는다는 것을 알 수 있다. 나중에 로그인 시도했을 때와 로그인을 성공한 후 거치는 필터체인의 역할에 대해서 알아봐야겠다.
'[개발] Spring Framework > Spring Security' 카테고리의 다른 글
| Spring Security (1) 대략적인 내용 (0) | 2020.08.09 |
|---|

댓글