이전 시간에는 kubebuilder를 사용하여 프로젝트를 구축하고, Custom Resource를 만들었다. 이번 시간에는 Custom Controller를 만들어서 ClusterJob의 기능을 직접 구현해볼 예정이다.
2025.10.25 - [DevOps/Kubernetes] - kubebuilder를 사용하여 Custom Resource, Custom Controller 만들어보기 [1]
kubebuilder를 사용하여 Custom Resource, Custom Controller 만들어보기 [1]
이번 글에서는 kubebuilder를 사용하여 Custom Resource, Custom Controller를 직접 만들어보는 과정을 정리해보았다.주제 정하기Custom Resource, Custom Controller 만들기 전에 가장 먼저 해야 할 것은 어떤 것을 만
beer1.tistory.com
Custom Controller 구현
Custom Controller는 internal/controller/clusterjob_controller.go 파일에서 구현하면 된다. 해당 파일을 열어보면 Reconcile 이라는 함수가 있는데, 여기서 컨트롤러 세부 로직을 구현하면 된다.
func (r *ClusterJobReconciler) Reconcile(ctx context.Context, req ctrl.Request) (ctrl.Result, error) {
	_ = logf.FromContext(ctx)

	// TODO(user): your logic here

	return ctrl.Result{}, nil
}
Controller 구현에 앞서 ClusterJob 구동과정을 다시 한번 살펴보자.
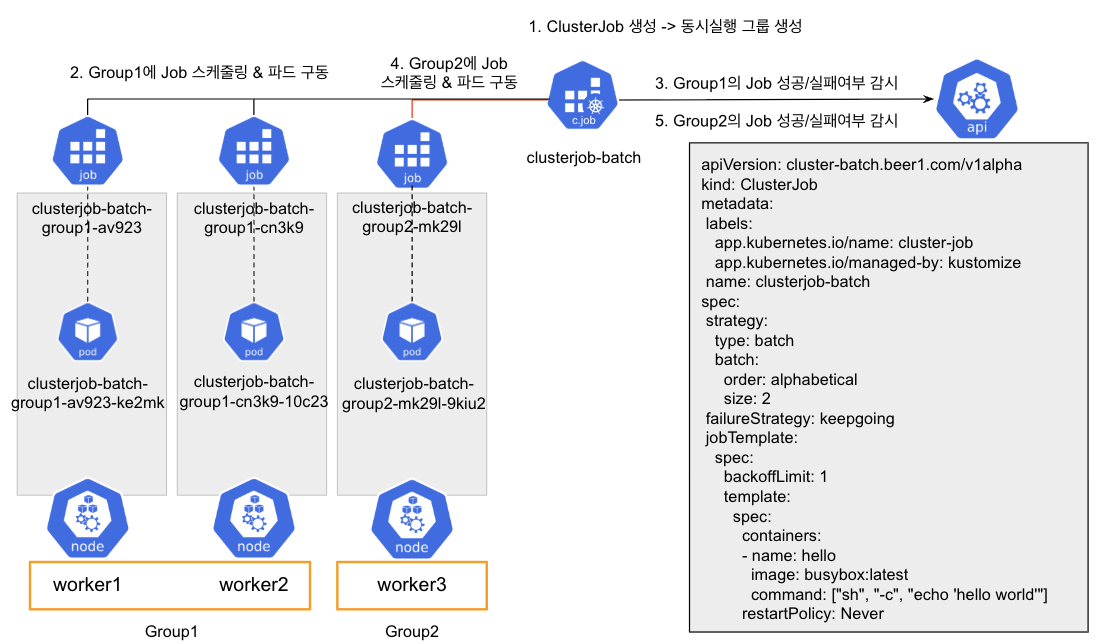
- ClusterJob이 생성되면 strategy에 따라 동시실행 그룹을 생성한다. 동시실행 그룹이 생성되면 ClusterJob이 구동할 준비가 완료되었다고 보면 된다.
- 생성된 동시실행 그룹별로 순회를 하여 그룹단위로 Job을 생성한다. Job을 생성할 때는 그룹에 속한 워커노드당 하나씩 Job을 생성하며, NodeAffinity를 통해 해당 워커노드에 파드가 스케줄링 될 수 있도록 제어하는 것이 필요하다.
- 그룹별 Job 생성이 완료되면 그룹별 Job이 성공 또는 실패가 될 때까지 Job의 상태를 주기적으로 체크한다.
- 모든 Job이 종료되었다면 성공/실패 여부를 집계한 후에 failureStrategy에 따라 다음 그룹으로 잡 실행을 계속 진행할지 끝낼지 결정한다. 하나라도 실패한 Job이 있으면서 failureStrategy가 exit라면 즉시 ClusterJob을 종료하고, 실패 처리를 한다.
- 그룹별로 2~4를 반복한 후 모든 그룹이 성공이라면 ClusterJob을 종료하고 ClusterJob은 성공으로 처리한다.
추가로, Controller가 동작하는 매커니즘을 다시 살펴보자.

- 먼저 요청에 의해 쿠버네티스에 커스텀 리소스가 생성된다. 이 때 담당 컨트롤러의 WorkQueue에 생성된 커스텀 리소스가 추가된다. (enqueue)
- Controller는 큐에 쌓여있는 커스텀 리소스를 꺼내온 다음 (dequeue), 해당 리소스의 Spec(원하는 상태)과 Status(현재 상태)를 확인한 다음 현재 상태를 원하는 상태로 맞추는 조정 작업을 진행한다. (Reconcile)
- 현재 상태에 따른 조정 작업을 끝낸 다음, 상태가 원하는 상태가 아니라면 다시 WorkQueue에 저장하여 다음 조정 작업을 유발시키고, 원하는 상태가 된다면 WorkQueue에 저장하지 않고 조정 작업을 완료한다.
컨트롤러의 핵심 부분은 Reconcile인데, Reconcile 함수를 구현할 때 가장 신경써야 할 부분은 리소스의 상태별로 조정 작업을 정의하고 구현하는 것이다. 우리는 앞서 Status를 정의할 때 Phase라는 필드를 정의했는데, 해당 필드가 리소스의 현재 상태를 나타내는 대표적인 값으로 볼 수 있다.
Controller를 구현할 때에는 리소스의 status.phase 별로 조정 작업을 구현하면 된다. Phase를 간단히 State diagram으로 표현하면 다음과 같다.
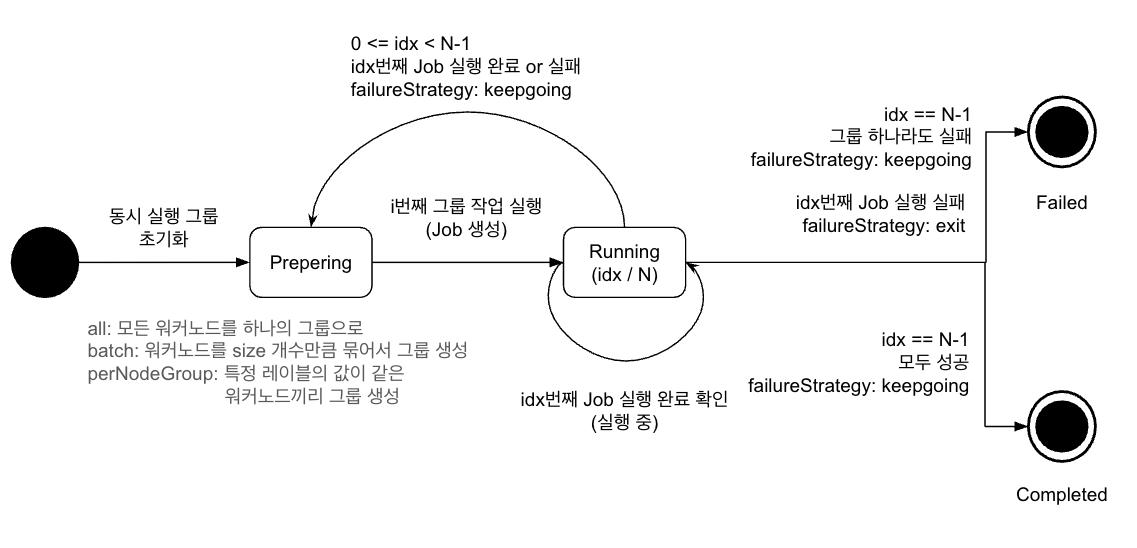
- 좌측의 진한 동그라미는 초기 상태를 의미한다. kubebuilder에서 커스텀 리소스가 최초로 생성될 때의 phase는 빈 값으로 할당된다.
- 우측의 이중 동그라미는 완료 상태를 의미한다. ClusterJob에는 Completed와 Failed라는 두개의 완료 상태가 있으며, 해당 상태에 도달하게 되면 더 이상 Reconcile은 하지 않는다.
- Preparing 단계는 i번째 그룹 작업을 실행하는 단계이다. 여기서는 status.currentIndex에 해당하는 그룹에 속한 모든 노드에 Job을 생성한다.
- Running 단계는 i번째 그룹 작업이 실행 중인 단계이다. 여기서는 현재 실행 노드 그룹에서 실행 중인 Job의 상태를 주기적으로 확인한다. 모든 Job이 완료되면 성공, 실패 및 현재 인덱스 및 실패 정책에 따라 ClusterJob을 완료처리 할지, 실패처리 할지, 다음 그룹 실행을 준비할지 결정한다.
State diagram을 참고하여 상태별 Reconcile을 단계별로 구현해보자.
Reconcile 구현 - 기초 구조
일단 Reconcile 함수부분을 다음과 같이 작성해보자. Reconcile의 대략적인 큰 틀은 다음 구조와 비슷하다.
func (r *ClusterJobReconciler) Reconcile(ctx context.Context, req ctrl.Request) (ctrl.Result, error) {
	var logger = logf.FromContext(ctx)

	var clusterJob clusterbatchv1alpha.ClusterJob

	// 1. ClusterJob 조회
	if err := r.Get(ctx, req.NamespacedName, &clusterJob); err != nil {
		// ClusterJob이 이미 삭제된 경우 핸들링
		logger.Info("ClusterJob is deleted", "namespace", clusterJob.Namespace, "name", clusterJob.Name)
		return ctrl.Result{}, client.IgnoreNotFound(err)
	}

	switch clusterJob.Status.Phase {
	case "":
		// TODO: Handle Initialization
	case "Preparing":
		// TODO: Handle Preparing phase
	case "Running":
		// TODO: Handle Running phase
	case "Completed":
		// TODO: Handle Completed phase
	case "Failed":
		// TODO: Handle Running phase
	default:
		// TODO: Handle Exception
	}

	// ClusterJob의 변경된 Status 저장
	if err := r.Status().Update(ctx, &clusterJob); err != nil {
		logger.Error(err, "unable to update ClusterJob status")
		// Status 업데이트 실패 시 재시도하되, 너무 빈번하지 않도록 지연 시간 설정
		return ctrl.Result{RequeueAfter: 1 * time.Second}, err
	}
	logger.Info("ClusterJob status update completed")

	// Completed나 Failed 상태가 아닌 경우에만 requeue
	if clusterJob.Status.Phase != "Completed" && clusterJob.Status.Phase != "Failed" {
		return ctrl.Result{RequeueAfter: 100 * time.Millisecond}, nil
	}

	return ctrl.Result{}, nil
}- 먼저 r.Get() 함수를 사용하여 큐에서 꺼낸 ClusterJob 이벤트 정보를 바탕으로 ClusterJob을 쿠버네티스로부터 가져온다. 만약 ClusterJob 이벤트가 처리되는 시점에 실제로 ClusterJob이 제거된 경우에는 별도의 처리를 하지 않아도 되어서 Reconcile을 종료하면 된다.
- crtl.Result{} 와 같이 Result를 빈 값으로 리턴하게 되면 현재 커스텀 리소스를 WorkQueue에 넣지 않고 종료한다는 의미이다.
- ClusterJob을 꺼내온 뒤에는 switch 문을 사용하여 ClusterJob의 Phase별로 동작을 구분짓는다. 여기서 case가 빈 값이면 초기 상태를 의미하며, Reconcile 동작 이후에 반드시 Phase를 다음 단계로 변경한 뒤에 WorkQueue에 넣어야 한다.
- Phase별 조정 작업이 완료된 후에는 r.Status.Update() 함수를 사용하여 변경된 Status를 쿠버네티스에 반영하고 해당 리소스를 다시 WorkQueue에 넣어서 다음 상태에 대한 조정 작업을 유도한다. 단, 완료 상태인 Completed, Failed 상태에 도달하면 WorkQueue에 넣지 않고 더 이상 조정 작업을 진행하지 않는다.
Reconcile()의 반환 값 타입은 ctrl.Result와 error인데, ctrl.Result 값을 어떻게 주냐에 따라 커스텀 리소스가 언제 조정 작업을 다시 진행하는지 정할 수 있다.
// 다음 조정 작업을 더 이상 하지 않음. (외부에서 Custom Resource 변경 작업이 진행되면 Reconcile은 진행됨)
return ctrl.Result{}, nil

// 반환 후 즉시 WorkQueue에 넣어서 조정 작업을 유도
// 하지만 공식적으로 RequeueAfter를 권장함.
return ctrl.Result{Requeue: true}, nil

// 반환 후 다음 조정 작업을 예약함.
return ctrl.Result{RequeueAfter: 10 * time.Second}, nil
일단 Reconcile에 대한 뼈대는 만들었고, Phase가 빈 값인 경우를 살펴보자. 여기서는 초기 상태에 대한 작업을 구현하면 되는데, ClusterJob에서는 클러스터 내 모든 노드를 조회한 다음, strategy에 따라 실행 노드그룹을 지정하는 작업을 구현하면 된다.
Reconcile 구현 - 초기 작업
func (r *ClusterJobReconciler) Reconcile(ctx context.Context, req ctrl.Request) (ctrl.Result, error) {

    ...

	switch clusterJob.Status.Phase {
	case "":
		// Group 스케줄링 되어있지 않으면 스케줄링 진행
		logger.Info("ClusterJob is not grouped. Grouping started.. ", "namespace", clusterJob.Namespace, "name", clusterJob.Name, "strategyType", clusterJob.Spec.Strategy.Type)
		if err := r.makeNodeGroups(ctx, &clusterJob); err != nil {
			return ctrl.Result{RequeueAfter: 10 * time.Second}, err
		}
    ...
}
r.makeNodeGroups() 라는 함수를 만들어서 실행 노드그룹을 만들어서 ClusterJob의 Status에 저장한다. 실행 노드 그룹을 만들 때는 워커노드를 조회해야 하는데, 네트워크 문제 등 여러 요인으로 실패할 가능성이 있기 때문에 실패에 대한 핸들링도 고려해야 한다. 가장 간단한 방식으로는 ClusterJob Status를 업데이트 하지 않았기 때문에 10초 후 재시도를 유도하도록 하면 된다.
이제 r.makeNodeGroups() 함수를 구현해보자. 해당 함수는 워커노드를 조회한 후, ClusterJob의 spec.strategy.type에 따라 실행 노드그룹을 만들어서 ClusterJob에 저장는 코드를 작성하면 된다.
internal/controller/clusterjob_controller.go
func (r *ClusterJobReconciler) makeNodeGroups(ctx context.Context, clusterJob *clusterbatchv1alpha.ClusterJob) error {
	var logger = logf.FromContext(ctx)

	// 노드 목록 조회
	nodeList, err := r.getNodeList(ctx)
	if err != nil {
		return fmt.Errorf("failed to get node list: %w", err)
	}

	// 전략에 따른 노드 그룹 생성
	var nodeGroups []clusterbatchv1alpha.NodeGroupStatus
	switch clusterJob.Spec.Strategy.Type {
	case "all":
		nodeGroups, err = createAllNodeGroups(ctx, clusterJob, nodeList)
	case "batch":
		nodeGroups, err = createBatchNodeGroups(ctx, clusterJob, nodeList)
	case "perNodeGroup":
		nodeGroups, err = createPerNodeGroupGroups(ctx, clusterJob, nodeList)
	default:
		return fmt.Errorf("unsupported strategy type: %s", clusterJob.Spec.Strategy.Type)
	}

	if err != nil {
		return fmt.Errorf("failed to create node groups: %w", err)
	}

	// 노드그룹을 ClusterJob status에 저장 및 Prepering 상태로 변경
	clusterJob.UpdatePreperingStatus(nodeGroups)

	logger.Info("Node groups created successfully",
		"namespace", clusterJob.Namespace,
		"name", clusterJob.Name,
		"strategy", clusterJob.Spec.Strategy.Type,
		"totalGroups", len(nodeGroups))

	return nil
}

// getNodeList는 클러스터의 모든 노드 목록을 조회한다.
func (r *ClusterJobReconciler) getNodeList(ctx context.Context) (*corev1.NodeList, error) {
	var nodeList corev1.NodeList
	if err := r.Client.List(ctx, &nodeList); err != nil {
		return nil, err
	}
	return &nodeList, nil
}
- 먼저 클러스터의 모든 워커노드를 조회한다.
- 그 다음에 spec.strategy.type에 따라 실행 노드그룹을 만든다. 각 type별로 실행 노드그룹을 만드는 로직은 다르기 때문에 별도의 함수로 구분지었다.
- 실행 노드그룹이 만들어지면 UpdatePreparingStatus() 함수를 사용하여 ClusterJob의 Status에 추가하고, ClusterJob을 Preparing 상태로 변경한다.
ClusterJob의 UpdatePreparingStatus()는 다음과 같이 구현하면 된다.
api/v1alpha/clusterjob_types.go
// 파일 하위에 추가

func (cj *ClusterJob) UpdatePreperingStatus(nodeGroups []NodeGroupStatus) {
	cj.Status.Phase = "Prepering"
	cj.Status.CurrentIndex = 0
	cj.Status.WaitGroups = len(nodeGroups)
	cj.Status.NodeGroups = nodeGroups
}- Preparing 단계의 ClusterJob의 초기 상태를 정의한다.
- currentIndex와 currentGroup은 각각 0번째 실행 그룹의 인덱스로 초기화하였다.
그 다음엔 spec.strategy.type에 따라 실행 노드그룹을 만드는 로직을 각각 작성해보자. 먼저 type=all의 경우는 다음과 같다.
internal/controller/clusterjob_controller.go
// createAllNodeGroups는 All 전략에 따라 노드 그룹을 생성한다.
func createAllNodeGroups(ctx context.Context, clusterJob *clusterbatchv1alpha.ClusterJob, nodeList *corev1.NodeList) ([]clusterbatchv1alpha.NodeGroupStatus, error) {
	var logger = logf.FromContext(ctx)
	logger.Info("Creating Batch node groups", "namespace", clusterJob.Namespace, "name", clusterJob.Name)
	// 노드 이름 추출
	nodeNames := extractNodeNames(nodeList)
	// 그룹 생성
	var nodeGroups []clusterbatchv1alpha.NodeGroupStatus

	group := clusterJob.CreateNodeGroup("all", nodeNames)
	nodeGroups = append(nodeGroups, group)

	return nodeGroups, nil
}

// extractNodeNames는 노드 목록에서 노드 이름들을 추출한다.
func extractNodeNames(nodeList *corev1.NodeList) []string {
	nodeNames := make([]string, len(nodeList.Items))
	for i, node := range nodeList.Items {
		nodeNames[i] = node.Name
	}
	return nodeNames
}- all 타입의 경우에는 가장 간단하며, 모든 워커노드를 하나의 실행 노드그룹에 저장하면 된다.
- 실행 노드그룹의 구조체는 clusterjob_types.go에 있으므로, 실행 노드그룹을 만드는 함수도 여기에 작성하였다.
api/v1alpha/clusterjob_types.go
func (cj *ClusterJob) CreateNodeGroup(groupSuffix string, nodes []string) NodeGroupStatus {
	return NodeGroupStatus{
		Name:  fmt.Sprintf("%s-%s", cj.Name, groupSuffix),
		Nodes: nodes,
	}
}
그 다음에는 type=batch인 경우이다.
internal/controller/clusterjob_controller.go
/ createBatchNodeGroups는 Batch 전략에 따라 노드 그룹을 생성한다.
// Batch 전략은 정해진 크기(Batch.Size)를 기준으로 노드그룹을 묶어서 생성한다.
// order가 random인 경우 노드 이름을 무작위로 섞고, alphabetical인 경우 노드그룹을 알파벳 순으로 묶어서 생성한다.
func createBatchNodeGroups(ctx context.Context, clusterJob *clusterbatchv1alpha.ClusterJob, nodeList *corev1.NodeList) ([]clusterbatchv1alpha.NodeGroupStatus, error) {
	var logger = logf.FromContext(ctx)
	logger.Info("Creating Batch node groups", "namespace", clusterJob.Namespace, "name", clusterJob.Name)

	size := clusterJob.Spec.Strategy.Batch.Size
	order := clusterJob.Spec.Strategy.Batch.Order

	// 노드 이름 추출
	nodeNames := extractNodeNames(nodeList)

	// order가 random인 경우 노드 이름을 무작위로 섞는다.
	if order == "random" {
		shuffleNodeNames(nodeNames)
	}

	// 그룹 생성
	var nodeGroups []clusterbatchv1alpha.NodeGroupStatus
	groupIndex := 0

	for start := 0; start < len(nodeNames); start += int(size) {
		end := min(len(nodeNames), start+int(size))
		group := clusterJob.CreateNodeGroup(strconv.Itoa(groupIndex), nodeNames[start:end])
		nodeGroups = append(nodeGroups, group)
		groupIndex += 1
	}

	return nodeGroups, nil
}

// shuffleNodeNames는 노드 이름 목록을 무작위로 섞습니다
func shuffleNodeNames(nodeNames []string) {
	randSource := rand.New(rand.NewSource(time.Now().UnixNano()))
	randSource.Shuffle(len(nodeNames), func(i, j int) {
		nodeNames[i], nodeNames[j] = nodeNames[j], nodeNames[i]
	})
}- type=batch인 경우에는 노드그룹 크기(size)와 그루핑 순서 지정방식에 대한 정보(order)를 가져와야 한다.
- order가 random인 경우에는 nodeNames 배열을 한번 섞는다.
- nodeNames 배열을 순회하여 size 개수만큼 끊어서 노드그룹을 하나씩 생성한다.
마지막으로 type=perNodeGroup인 경우이다.
internal/controller/clusterjob_controller.go
const (
	ClusterJobNullGroupName = "null-group"
)

// createPerNodeGroupGroups는 perNodeGroup 전략에 따라 노드 그룹을 생성한다.
func createPerNodeGroupGroups(ctx context.Context, clusterJob *clusterbatchv1alpha.ClusterJob, nodeList *corev1.NodeList) ([]clusterbatchv1alpha.NodeGroupStatus, error) {
	var logger = logf.FromContext(ctx)
	logger.Info("Creating per-node-group groups", "namespace", clusterJob.Namespace, "name", clusterJob.Name)

	groupLabel := clusterJob.Spec.Strategy.PerNodeGroup.GroupLabel
	ignoreNull := clusterJob.Spec.Strategy.PerNodeGroup.IgnoreNull

	// 레이블별로 노드 그룹화
	nodesByGroupLabel := groupNodesByLabel(nodeList, groupLabel, ignoreNull)

	// 그룹 생성
	var nodeGroups []clusterbatchv1alpha.NodeGroupStatus
	for groupName, nodes := range nodesByGroupLabel {
		group := clusterJob.CreateNodeGroup(groupName, nodes)
		nodeGroups = append(nodeGroups, group)
	}

	return nodeGroups, nil
}

// groupNodesByLabel은 노드를 레이블 값에 따라 그룹화한다.
func groupNodesByLabel(nodeList *corev1.NodeList, groupLabel string, ignoreNull bool) map[string][]string {
	nodesByGroupLabel := make(map[string][]string)

	for _, node := range nodeList.Items {
		labelValue, ok := node.Labels[groupLabel]
		groupKey := labelValue

		if !ok && !ignoreNull {
			groupKey = ClusterJobNullGroupName
		} else if !ok && ignoreNull {
			continue
		}

		nodesByGroupLabel[groupKey] = append(nodesByGroupLabel[groupKey], node.Name)
	}

	return nodesByGroupLabel
}- type=perNodeGroup인 경우에는 그루핑할 노드 레이블 키값(groupLabel)과 노드 레이블이 없는 경우에 대한 동작 정보(ignoreNull)를 가져와야 한다.
- groupNodesByLabel 함수를 사용하여 워커노드를 특정 레이블 키값으로 그루핑한다. 만약 ignoreNull이 true면 특정 레이블이 지정되어 있지 않은 노드는 제외되고, false라면 null-group 이라는 이름의 그룹으로 그루핑된다.
Controller 배포
일단 초기 작업까지만 구현해보고 컨트롤러를 배포해보자. kubebuilder에서 컨트롤러를 배포하는 도구도 지원하고 있기 때문에 쉽게 배포가 가능하다.
일단 컨트롤러 이미지부터 배포해야 한다. 아래 명령어를 사용하여 컨트롤러 이미지를 빌드하고 레지스트리로 푸쉬해보자.
$ make docker-build docker-push IMG=beer1/cluster-job-controller:dev
이미지가 생성되었다면 다음 명령어를 사용하여 컨트롤러를 쿠버네티스에 배포해보자.
$ make deploy IMG=beer1/cluster-job-controller:dev
배포가 되었다면 컨트롤러가 잘 떠있는지 확인해보자. 파드가 정상으로 떠있으면 성공이다.
$ kubectl get po -n cluster-job-system
NAME                                              READY   STATUS    RESTARTS   AGE
cluster-job-controller-manager-689bfd9d55-njz4q   1/1     Running   0          109s
컨트롤러가 정상임을 확인한 후에 다시 ClusterJob을 생성해보자.
apiVersion: cluster-batch.beer1.com/v1alpha
kind: ClusterJob
metadata:
  name: clusterjob-sample
spec:
  strategy:
    type: all
  jobTemplate:
    spec:
      backoffLimit: 1
      template:
        spec:
          containers:
          - name: hello
            image: busybox:latest
            command: ["sh", "-c", "echo 'hello world'"]
          restartPolicy: Never
그 다음에 Status에 실행그룹이 잘 생성되고 phase가 Preparing이 되어있는지 확인해보자.
$ kubectl get clusterjob clusterjob-sample -o yaml
apiVersion: cluster-batch.beer1.com/v1alpha
kind: ClusterJob
metadata:
  name: clusterjob-sample
  namespace: cluster-job-system
spec:
  failureStrategy: keepgoing
  jobTemplate:
    spec:
      backoffLimit: 1
      template:
        spec:
          containers:
          - command:
            - sh
            - -c
            - echo 'hello world'
            image: busybox:latest
            name: hello
          restartPolicy: Never
  strategy:
    type: all
하지만 status가 빈 값이다. 동작이 이상한데, 이런 경우에는 컨트롤러의 로그를 확인해봐야 한다. 로그를 확인해보면 노드를 조회하는 권한이 없다고 뜰 것이다.
2025-10-25T09:09:19Z ERROR controller-runtime.cache.UnhandledError Failed to watch {"reflector": "pkg/mod/k8s.io/client-go@v0.34.0/tools/cache/reflector.go:290", "type": "*v1.Node", "error": "failed to list *v1.Node: nodes is forbidden: User \"system:serviceaccount:cluster-job-system:cluster-job-controller-manager\" cannot list resource \"nodes\" in API group \"\" at the cluster scope"}
RBAC
쿠버네티스의 파드 내에서 쿠버네티스 리소스를 조회하려면 ServiceAccounts와 Role과 같은 RBAC 리소스가 필요하다. 이걸 직접 컨트롤러 파드에 주입해도 되지만, kubebuilder는 어노테이션을 기반으로 RBAC 리소스까지 같이 구성할 수 있도록 기능을 제공해주고 있다.
일단 clusterjob_controller.go 파일에 가보자. 여기서 Reconcile 함수 윗단에 보면 다음과 같이 어노테이션이 기본적으로 추가되어 있을 것이다.
// +kubebuilder:rbac:groups=cluster-batch.beer1.com,resources=clusterjobs,verbs=get;list;watch;create;update;patch;delete
// +kubebuilder:rbac:groups=cluster-batch.beer1.com,resources=clusterjobs/status,verbs=get;update;patch
// +kubebuilder:rbac:groups=cluster-batch.beer1.com,resources=clusterjobs/finalizers,verbs=update
kubebuilder에서는 +kubebuilder:rbac 어노테이션으로 컨트롤러가 필요한 RBAC 권한을 지정할 수 있다.
그러면 노드 조회 권한이 필요하기 떄문에 +kubebuilder:rbac 어노테이션으로 컨트롤러에게 노드 권한을 주면 된다. 위의 어노테이션 아래에 해당 어노테이션을 추가하자.
// +kubebuilder:rbac:groups="",resources=nodes,verbs=get;list;watch
그 다음에 make manifest를 사용하면 RBAC 매니페스트가 자동으로 생성된다. config/rbac/role.yaml을 확인해보면 알 수 있다. 이 후에 make deploy 명령어로 다시 배포하면 RBAC가 반영된다.
RBAC 반영 후 다시 ClusterJob을 생성해보면 status가 잘 반영된 것을 확인할 수 있다.
$ kubectl get clusterjob clusterjob-sample -o yaml
apiVersion: cluster-batch.beer1.com/v1alpha
kind: ClusterJob
metadata:
  annotations:
    kubectl.kubernetes.io/last-applied-configuration: |
      {"apiVersion":"cluster-batch.beer1.com/v1alpha","kind":"ClusterJob","metadata":{"annotations":{},"name":"clusterjob-sample","namespace":"cluster-job-system"},"spec":{"jobTemplate":{"spec":{"backoffLimit":1,"template":{"spec":{"containers":[{"command":["sh","-c","echo 'hello world'"],"image":"busybox:latest","name":"hello"}],"restartPolicy":"Never"}}}},"strategy":{"type":"all"}}}
  creationTimestamp: "2025-10-25T09:20:30Z"
  generation: 1
  name: clusterjob-sample
  namespace: cluster-job-system
  resourceVersion: "48916"
  uid: 13f4943a-9c23-42fc-a7e3-e509c64f9523
spec:
  failureStrategy: keepgoing
  jobTemplate:
    spec:
      backoffLimit: 1
      template:
        spec:
          containers:
          - command:
            - sh
            - -c
            - echo 'hello world'
            image: busybox:latest
            name: hello
          restartPolicy: Never
  strategy:
    type: all
status:
  completedGroups: 0
  currentIndex: 0
  currentGroup: desktop-control-plane
  failedGroups: 0
  nodeGroups:
  - name: clusterjob-sample-all
    nodes:
    - desktop-control-plane
    - desktop-worker
    - desktop-worker2
  phase: Preparing
  waitGroups: 1
마무리
이번 시간에는 ClusterJob 커스텀 컨트롤러를 일부 구현해보고, 실제로 쿠버네티스 클러스터에 배포하고 ClusterJob 리소스를 생성한 뒤에 상태 변경이 되는 것 까지 확인하였다. 추가로 kubebuilder에서 커스텀 컨트롤러의 RBAC를 구성하는 방법까지 알아보았다.
다음 시간에는 컨트롤러를 완전히 구현하여 의도했던 대로 모든 워커노드에 대해 잡을 실행하는지 확인하는 것 까지 다뤄볼 예정이다.
2025.10.26 - [DevOps/Kubernetes] - kubebuilder를 사용하여 Custom Resource, Custom Controller 만들어보기 [3]
kubebuilder를 사용하여 Custom Resource, Custom Controller 만들어보기 [3]
이전 시간에는 kubebuilder를 사용하여 ClusterJob이라는 Custom Controller의 일부를 구현하였고, 실제로 쿠버네티스에 배포하여 동작을 확인하였다. 이번 시간에는 ClusterJob Custom Controller의 나머지 기능들
beer1.tistory.com
ClusterJob에 대한 코드는 해당 레포에서 관리하고 있다.
https://github.com/beer-one/cluster-job/
GitHub - beer-one/cluster-job: cluster-job CRD
cluster-job CRD. Contribute to beer-one/cluster-job development by creating an account on GitHub.
github.com
'DevOps > Kubernetes' 카테고리의 다른 글
| kubebuilder를 사용하여 Custom Resource, Custom Controller 만들어보기 [3] (0) | 2025.10.26 |
|---|---|
| kubebuilder를 사용하여 Custom Resource, Custom Controller 만들어보기 [1] (0) | 2025.10.25 |
| Kubernetes Custom Resource와 Custom Controller 소개 (0) | 2025.10.13 |
| Kubernetes Node ContainerGCFailed 트러블슈팅 (0) | 2025.09.30 |
| CoreDNS DNS Resolve timedout과 ndots (0) | 2025.09.27 |


댓글